Antique reproduction furniture

CoboFlooring™

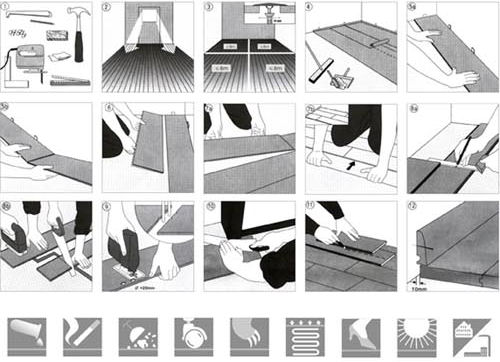
CoboFlooring can be installed over most existing floors with little or no preparation. The floating floor is not glued to the sub floor. CoboFlooring is designed for easy maintenance and is highly resistant to most chemicals and stains. It can be cleaned with water and soap, resists bacteria infiltration, and is also mold-resistant (making it ideal for allergy sufferers).


Fitting Instructions For Laminate Flooring

There are many choices in flooring today, and it can be hard to know where to begin. But at Cobo Flooring, we're here to help. Cobo Flooring offers what we believe is best option in water proof flooring.


Installation:

  • Lay the first floors panel with the groove towards the wall, It is best to begin in a corner.
  • Set the distance to the wall at 8 to 10 mm with a spacer.
  • Then fit further panels without gluing.
  • For accurate cutting of the last panel rotate this through 180
    degrees and with the pattern side upwards Place beside the already
    existing row so that tongue lies next 10 tongue
  • Include the 10 mm play at the end .
  • When doing this always saw from the upper surface of the panel in
    order to avoid splintering the edges. When using an electric jig
    saw or a handheld circular saw the patterned side must be placed
    facing downwards.
  • Then the line of the wall must be marked on the first (still unglued)
    panel row using a spacer.
  • Saw the panels longitudinally according to the marking.
  • Check that the first two rows are absolutely straight using a
    guideline.
  • Slat each new row with the leftover piece(min.40cm length)from
    the previous row.
  • When the first three rows are down precisely start with the
    glueing. Put glue amply on the tongue in the long and butt end
    of the panel.
  • Hammer carefully glued edge onto previous board with the push
    block.
  • When fitting the panels together glue must exude from the full
    length of the joint.
  • Take away excess glue with a scraper and wipe over with a damp
    cloth.


Heating pipes and room dividers:

  • First cut the panel to the correct length.
  • Then lay the panel section beside the actual position measure the
    recesses with a ruler and draw in.
  • Now drill out the marked sections.
  • Saw the panel through the bored holes.
  • Here too remember the necessary distance(8-10mm) on both sides.
  • Apply glue to the sawn-off piece and press tightly together behind
    the heating pipe.

When a doorframe has to be shortened:

  • Lay a panel next to the frame with the pattern side downwards
  • Cut into the doorframe with the straight back saw.
  • Then slide the panel under the frame with the pattern side upwards.
    At the end:
  • Measure the exact width of the last panel row.
  • To do this lay a panel on the previous panel row.
  • Then lay a second panel on the panel to be measured with the
    tongue to the wall and use as straightedge and saw the panel along
    the marking.
  • Please do not forget the wall spacing!
  • Fit the last panel carefully using the pull-iron. Ready!
  • Your floors can be walked on and furnished after 24 hours.